Flowing turn signal indicators are the rare bike upgrade that looks good and does something useful at the same time. A standard bulb blinks on and off in one place; a sequential light sweeps along a bar, and movement is what human eyes notice fastest in traffic. This guide explains how flowing turn signal indicators work, what to look for in a set, how the electrical side differs from ordinary bulbs, how to fit and wire them without guesswork, and the legal points every rider should check before fitting anything to the outside of a bike.
Why flowing turn signal indicators get noticed
Being seen is the whole job of an indicator. A driver pulling out of a side road is scanning quickly, and a small blinking point competes with headlights, brake lights, shop signs and everything else in the scene.
A sweep is different. Motion across a line reads as direction rather than as a dot, and it also tells the observer which way you intend to go, because the light travels outward towards the turn. That is why flowing turn signal indicators register faster than a conventional flash in busy traffic.
The second advantage is brightness and response. LEDs reach full output instantly and hold their colour well, while filament bulbs take a fraction of a second to rise and fade. At night, on a bike that is already small in a driver’s mirror, that difference is worth having.
Many sets, including this one, add a daytime running light function, so the bar glows continuously and switches to a sweep when you signal. A bike with a permanent light signature is easier to place on the road than one that only appears when it moves, which is the single strongest argument for flowing turn signal indicators.
How the sequential effect works
Inside each of the flowing turn signal indicators is a strip of individual LEDs and a small controller. Rather than powering all of them at once, the controller lights them in order, holds the full bar briefly, then resets and repeats. The whole cycle happens in well under a second.
Because each LED is switched electronically, the same strip can do more than one job. Running at low output in white gives the daytime running light; switching to amber and sweeping gives the indicator. That is how a single unit provides both functions without extra hardware.
The important consequence is electrical. A set of flowing turn signal indicators draws far less current than the filament bulbs it replaces, and most bike flasher relays rely on that current to time the flash. Remove the load and the relay flashes much faster, which is the well-known hyper-flash problem covered further down.
Everything else is packaging: a lens that spreads the light evenly, a housing that keeps water out, and a cable with enough length to reach the loom. Those three things separate a set that lasts from one that fills with water in the first monsoon.
What to look for in a set of flowing turn signal indicators
Four points matter far more than the marketing photographs when you compare flowing turn signal indicators.
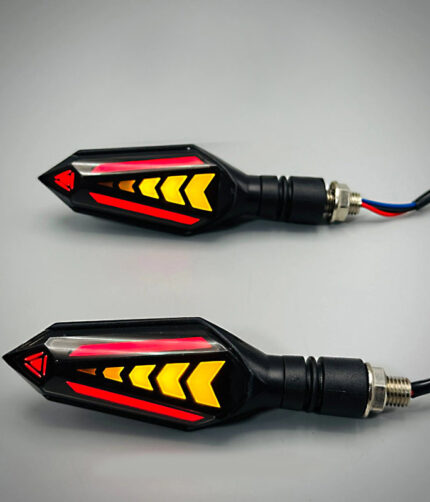
Amber colour and lens quality
Indicators must read as amber, and a good lens produces an even glow rather than visible hot spots where each LED sits. Hold a set at arm’s length: you should see one continuous bar of light, not a row of dots.
Sealing and weather resistance
Water is what kills cheap lighting. Look for a properly sealed housing, a potted or gasketed rear face and a cable gland where the wire exits rather than a bare hole filled with glue. Anything mounted on a bike lives in rain, dust and pressure washing.
Cable length and connectors
Short cables force joins in awkward places. Check that the leads reach comfortably to where you intend to tap in, and that the connectors are proper weatherproof plugs or at least sealed with heatshrink. Most electrical faults on a bike start at a bad join.
Mounting hardware
Look at how the unit attaches: a threaded stem with a nut, adhesive backing, or a bracket. A stem and nut through an existing hole is the most secure and the easiest to reverse later, which matters if the bike is not yours forever. Good flowing turn signal indicators come with hardware that fits without improvisation.
The WLD Store pick: LED DRL Flowing Turn Signal Indicators
WLD Store lists these flowing turn signal indicators under Automotive and Car Accessories. The listing gives these details.
- Product: LED DRL Flowing Turn Signal Indicators, supplied as a set of 2 pieces
- Brand: WLD
- Categories: Automotive, Car Accessories
- Effect: sequential flowing LED indicators, with a daytime running light function
- Purpose: making a bike more visible, and giving it a cleaner look
- SKU: WLD-PK-0002-(PD-260505062014)
- Availability: available across Pakistan through secure checkout
The full listing is on the LED DRL Flowing Turn Signal Indicators product page. A pair is the normal way to buy these, since indicators are replaced in matched sets so that both sides sweep identically.
Fitting: what the job actually involves
This is a straightforward job for anyone comfortable with basic wiring, and a workshop job for anyone who is not. Electrical work on a vehicle deserves respect, so if you are unsure at any step, have a mechanic finish it.
- Disconnect the battery first. Negative terminal off before anything else. Every shortcut here ends in a blown fuse or a damaged relay.
- Test before mounting. Hold the units against the loom connections and check both the sweep and the daytime function before you drill, glue or tighten anything.
- Identify the wires. Most sets use a positive feed, a ground and a separate feed for the running light. Match them to the bike’s existing indicator wires and a switched live for the running light.
- Make proper joins. Solder and heatshrink, or sealed crimp connectors. Twisted wire and tape will fail in the first heavy rain.
- Route cables away from heat and movement. Keep leads clear of the exhaust, the steering stops and anything that pivots, and secure them with cable ties every few inches.
- Leave a drip loop. A small downward loop before each connector means water runs off rather than following the cable into the plug.
- Reconnect and test both sides. Check left, right, hazards if fitted, and the running light, then ride slowly and confirm nothing rattles loose.
Take the extra ten minutes on cable routing. Almost every problem people report with flowing turn signal indicators comes down to a chafed wire or a connector that filled with water, not the lights themselves.
The hyper-flash problem and how to fix it
This is the single most common surprise after fitting flowing turn signal indicators, and it catches people out because everything looks correctly wired.
A conventional flasher relay measures current to decide when a bulb has blown. If a bulb fails, the current drops and the relay flashes quickly to warn you. LEDs draw a small fraction of the current a filament bulb does, so the relay sees the same drop and starts flashing fast even though both units work perfectly.
There are two standard fixes. The first is an electronic or LED-compatible flasher relay, which does not care about current and gives a correct, steady flash rate. This is the cleaner solution and usually the cheaper one over time.
The second is a load resistor wired in parallel with each indicator, which mimics the current draw of a filament bulb. It works, but resistors get genuinely hot and must be mounted on metal away from plastic, cables and anything you might touch. Between the two, most riders fitting flowing turn signal indicators are better served by changing the relay.
Staying legal and safe
Lighting is one of the most regulated parts of any vehicle, and rules differ between countries and even between provinces. A few principles hold almost everywhere, and the rest you must check locally.
Indicators should be amber and must not be obscured. Front and rear pairs need to be separated by a minimum distance and mounted at a sensible height, and they must be visible from the required angles. A set mounted too close together, or tucked behind bodywork, may fail an inspection even if it looks good.
Daytime running lights should be white and forward facing, and they must not dazzle. Coloured decorative lighting, flashing patterns and anything resembling emergency vehicle lighting are restricted almost universally.
Before buying, check what your local authority requires for approval markings and mounting positions, and check whether your insurer needs to know about modifications. Flowing turn signal indicators are widely used, but responsibility for compliance sits with the rider, not the seller.
Flowing turn signal indicators versus standard LED and bulb units
Standard filament indicators are cheap, universally available and understood by every mechanic. They are also dim by modern standards, fragile under vibration and slow to reach full brightness.
Plain LED indicators fix the brightness and durability without the sweep. They are a sensible middle option, and they still require the relay fix, so the work involved is almost identical.
Flowing turn signal indicators add the sequential effect and, in sets like this one, a daytime running light. The trade-off is a slightly more complex wiring job, and more variation in quality between products because there is a controller inside each unit. If you are already doing the work and changing the relay anyway, the extra function costs very little effort.
Care and maintenance
- Monthly: clean the lenses with soapy water and a soft cloth. Road film dulls output surprisingly fast, and a dirty lens undoes the visibility you paid for.
- Monthly: check the mounting nuts, since vibration loosens them and a swinging indicator strains the cable at the gland.
- After heavy rain or washing: look for condensation inside the lens. A little haze that clears is normal; standing water means a failed seal.
- Every few months: inspect the connectors for green corrosion and repack them with dielectric grease if needed.
- When washing: keep a pressure washer well back. Forcing water at a seal is the fastest way to ruin flowing turn signal indicators.
Common problems and quick fixes
- Both sides flash too fast. Classic hyper-flash. Fit an LED-compatible flasher relay, or add load resistors mounted safely on metal.
- One side does not work. Almost always the ground connection. Check the earth point for paint, rust or a loose ring terminal before suspecting the unit.
- The sweep runs backwards. The left and right units are swapped. Sequential lights are handed, so they must be fitted on the correct sides.
- Water inside the lens. The seal or the cable gland has failed. Dry it, reseal it properly, and add a drip loop so water cannot track along the cable.
Who should think twice
Riders with a bike under warranty should check what the manufacturer allows before altering the loom, since electrical modifications are a common reason for a claim being refused.
Anyone who is not confident with wiring should budget for fitting rather than skipping it. A bad join on a lighting circuit can take out a fuse, a relay or, at worst, leave you without indicators on a dark road.
And if your bike must pass a strict inspection with approval markings, buy only what your local rules accept. Flowing turn signal indicators without the required markings can be perfectly good lights and still fail an inspection, which is an avoidable disappointment.
Buying checklist
- Is the indicator light clearly amber, with an even bar rather than visible dots?
- Is the housing properly sealed, with a cable gland rather than glue around the wire?
- Are the cables long enough to reach my loom without extra joins in exposed places?
- Does the mounting hardware suit my bike, and can I reverse the fitting later?
- Do I have an LED-compatible relay, or will I need one to avoid hyper-flash?
Other Automotive picks at WLD Store
These three sit in the same part of the catalogue for riders and drivers.
Frequently asked questions about flowing turn signal indicators
Do flowing turn signal indicators need a special relay?
Usually yes. LEDs draw much less current than filament bulbs, so a standard flasher relay reads the low load as a blown bulb and flashes rapidly. An LED-compatible relay solves it cleanly; load resistors are the alternative but they run hot and need careful mounting.
Are they legal on the road?
Sequential indicators are widely used, but the rules on colour, position, spacing and approval markings vary by country. Check your local requirements and your insurer’s position on modifications before fitting, because compliance is the rider’s responsibility.
Can I fit flowing turn signal indicators myself?
If you are comfortable disconnecting a battery, identifying indicator wires and making soldered or sealed crimp joins, yes. If any of that is unfamiliar, a workshop will fit a set quickly and the cost is small compared with a damaged loom.
Will they work in heavy rain?
A properly sealed set will, provided the joins are sealed too. Most water problems come from connectors rather than housings, so use weatherproof plugs, seal the joins with heatshrink and leave a drip loop before each connector.
What is the daytime running light for?
It gives the bike a constant light signature so other drivers can judge your position and distance in daylight. On sets like this one the bar glows steadily and switches to the amber sweep when you signal.
Do I have to replace both indicators at once?
Yes, and they are sold in pairs for that reason. Mixing a sequential unit with an old bulb type gives mismatched brightness and timing, which is confusing to other road users and defeats the purpose of fitting flowing turn signal indicators in the first place.
Where to mount them for the best visibility
Position decides how much of the benefit you actually get. A bright light aimed at nobody is wasted, and the difference between a good and a poor mounting point is often half a metre.
- Keep the pair well separated. The wider apart the two units sit, the clearer the signal is at a distance, and most regulations set a minimum separation for exactly that reason.
- Mount at a useful height. Roughly at headlight level at the front works well, because that is where drivers already look when judging an approaching bike.
- Check the viewing angles. Stand at forty-five degrees to the front and rear of the bike. If the housing or bodywork hides the light from there, the mounting point is wrong.
- Keep them clear of luggage. Panniers, top boxes and a tail bag can block the rear pair completely, which is a common and dangerous oversight.
- Stay away from exhaust heat. Heat shortens the life of any sealed electronic housing, so keep flowing turn signal indicators and their cables well clear of the headers and silencer.
Once fitted, ask someone to stand where a car would be and watch you signal, in daylight and after dark. Two minutes of checking beats discovering a blind spot at a junction.
Riding at night and in poor weather
Dust, fog and heavy rain scatter light and reduce the distance at which any indicator can be read, so treat good lighting as one part of being seen rather than the whole of it.
Signal earlier than you would in clear conditions, giving other road users more time to notice the sweep and react. Keep the lenses genuinely clean, because a film of road dirt cuts output far more than most riders expect, and clean flowing turn signal indicators are noticeably brighter than dirty ones.
Reflective material on the bike and on your jacket keeps working when a light is hidden behind traffic, and it costs nothing to run. Position yourself where mirrors can see you, and remember that no lighting upgrade compensates for sitting in a driver’s blind spot.
A visibility upgrade is only worth doing properly: correct amber colour, sealed housings, sound joins, an LED-compatible relay and a quick check of local rules before you buy. Do those five things and the lights will be trouble-free for years and genuinely safer than what came off the bike. You can see the listing on the LED DRL Flowing Turn Signal Indicators page or browse more parts in the Car Accessories section. For background on how vehicle lighting is regulated and why indicators are amber, the overview of automotive lighting on Wikipedia is worth reading.

Add comment