An electric engraving pen turns a plain object into a marked one in about thirty seconds. It writes on metal, glass, wood and hard plastic, and it does it without a workshop, a vice or any real setup.
This guide explains how the tool works, which materials take a mark well and which fight back, the technique that produces a clean line instead of a scratchy one, and how to mark valuables for security. There is a starter project list, a safety section, a maintenance routine, a troubleshooting list, a buying checklist and six questions answered for readers in Saudi Arabia.
What an electric engraving pen actually does
Inside the body is a small motor driving a hardened tip in a rapid vibration. The tip does not cut the way a knife does; it chips away microscopic amounts of material with thousands of tiny impacts.
Because the work is done by vibration rather than pressure, an electric engraving pen removes the need to push hard. That is the single most useful thing to understand about the tool, and the mistake almost every beginner makes is leaning on it.
The result is a permanent mark that sits below the surface rather than on top of it. Unlike ink or paint, it cannot be wiped, washed or scrubbed away, which is exactly why the category exists.
Depth is controlled by speed and by how many times you pass over the same line. A single light pass gives a fine, subtle mark; three passes over the same path gives something you can feel with a fingernail. The craft and its long history are covered on the engraving reference page.
Where it beats the alternatives
An electric engraving pen is not the only way to mark an object, and each alternative has a situation where it wins.
A permanent marker is fast and free, and it survives about as long as the next cleaning. For anything that will be handled, washed or left in the sun, it is temporary in practice.
Metal stamping sets give a beautiful, deep mark, but they need a hammer, a hard backing and a steady hand, and they only produce the characters in the set. An electric engraving pen writes anything you can write, including curves and signatures.
Laser engraving is the professional answer and produces the cleanest results by a wide margin. It also means sending the item somewhere, paying per piece and waiting, which rarely makes sense for marking six garden tools.
What makes a good electric engraving pen
Four features change how the tool feels and what it can handle.
Variable speed control
This matters more than anything else. Glass and ceramic need a low speed and a light touch, because too much energy chips the surface instead of marking it.
Hardened steel needs the opposite: a higher setting and patience. An electric engraving pen with a single fixed speed will always be wrong for one of those two jobs.
Interchangeable tips
Tips wear down, and different tips suit different work. A fine point gives detail and small lettering; a broader point covers a bold line quickly without repeated passes.
Check that spare tips are available and that changing one does not require dismantling the tool. A pen with a sealed, non-replaceable tip has a short and fixed working life.
Balance and grip
You hold this like a pen, and you will hold it for longer than you expect once a project starts. A slim body with a textured grip section is far easier to control than a fat, slippery barrel.
Vibration is the other half of comfort. Some transfers into your hand by design; a great deal of it means numb fingers after fifteen minutes and a wobbling line.
Cordless or corded
A cordless electric engraving pen goes to the work rather than making the work come to a socket, which matters when you are marking a bicycle frame or a door. A corded model never runs out mid-line. Decide which annoyance you would rather have.
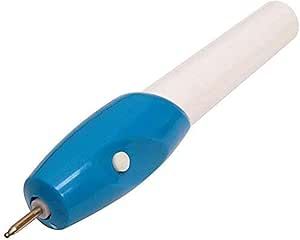
The WLD Store pick: Electric Engraving Pen
WLD Store lists the Electric Engraving Pen in its Office & Stationery and Office Supplies range. Here is what the listing states:
- Product: Electric Engraving Pen
- Brand: WLD
- Category: Office & Stationery — Office Supplies
- Type: described as a cordless engraver
- Materials: the listing states it writes, etches and carves on metal, wood, glass, plastic and ceramic
- Control: described as having variable speed control for detail work
- Tips: the listing states interchangeable tips are included for different engraving styles
- Availability: available across Saudi Arabia with secure checkout
- SKU: WLD-KSA-0067-(KD-KD0174)
Current images and availability are on the Electric Engraving Pen product page.
Which materials take a mark well
Not every surface behaves the same way, and knowing what to expect prevents a ruined first project.
Soft metals
Aluminium, brass, copper and pewter are the easiest materials for an electric engraving pen. They mark cleanly at a moderate speed and rarely need more than two passes, which makes them the ideal place to learn.
Hardened steel
Knife blades, tool shanks and some stainless items are much harder. They can be marked, but expect a higher speed, several passes and a tip that dulls faster than it does on aluminium.
Glass and ceramic
These are brittle rather than hard, so the risk is chipping. Use the lowest speed, the lightest touch and a fine tip, and accept that the result is a frosted line rather than a deep groove.
Wood and hard plastic
Both mark easily, and both can go too deep too quickly. Wood grain will also steer the tip along the grain lines, so lettering across the grain is easier to control than lettering with it.
Technique: getting a clean line
The difference between a scratchy mark and a clean one is almost entirely method rather than equipment.
- Secure the workpiece. Anything that can slide will slide. A rubber mat, a clamp or a helping hand removes half the problem.
- Draw the design first. A fine marker line gives you something to follow, and it wipes off afterwards with alcohol.
- Hold it like a pen, not a chisel. A shallow, natural writing angle gives control; a steep angle digs in.
- Let the tool do the work. Pressing harder does not deepen the line, it just makes an electric engraving pen skip and wander.
- Move slowly and consistently. Speed of travel controls line quality more than motor speed does.
- Build depth in passes. Two light passes beat one heavy one every time, and they let you correct the path before it is permanent.
- Rest your hand on the work. A supported wrist produces a steady line; an unsupported one produces a wobble on every curve.
Starter projects worth trying
The fastest way to learn an electric engraving pen is on something that does not matter. A few scrap pieces teach more than any instructions.
Start with an aluminium drinks can, flattened. It is free, it marks at almost any setting, and it shows immediately how travel speed changes the line.
Then try a set of kitchen or garden tools. Marking handles with initials is genuinely useful and forgiving, because a slightly uneven line on a spade handle bothers nobody.
Once the hand is steady, an electric engraving pen does well on gifts: a name on a metal water bottle, a date on the back of a picture frame, a short line on a pen barrel.
Glass is the last thing to attempt, not the first. It looks the most impressive and punishes a heavy hand more than any other material.
Marking valuables for security
One of the most practical uses of an electric engraving pen has nothing to do with decoration. A permanent mark on a valuable item makes it far less attractive to resell and much easier to identify.
Mark somewhere visible but not disfiguring — the underside of a laptop, the inside of a tool casing, the frame of a bicycle beneath the down tube.
Use something identifying but not sensitive. Never engrave a national ID number, a passport number or a phone number. A surname, initials or a short code you keep a record of does the job without publishing personal data.
Photograph the mark afterwards. An electric engraving pen leaves a record on the object; a photo gives you a record you can hand to someone else.
Safety while engraving
The tool is small, and that leads people to skip precautions they would never skip with a drill.
Wear eye protection. An electric engraving pen throws fine particles, and glass and hard plastic throw them further than anything else.
Work in a ventilated space, especially on plastics and coated metals. Any coating, paint or plating being removed becomes airborne dust, and a mask is sensible for anything beyond a couple of minutes.
Keep fingers away from the line of travel. If the tip skips off a hard surface, it goes wherever it was pointing, and an electric engraving pen at full speed will mark skin as readily as metal.
Finally, never engrave anything pressurised, sealed or containing fuel. Gas canisters, aerosol cans and lighters are absolutely not candidates for marking.
Care and maintenance
Maintenance is simple, and skipping it is what turns a working tool into a drawer ornament.
Brush dust off the tip and the collar of the electric engraving pen after every session. Metal particles pack into the mechanism and eventually restrict the vibration.
Inspect the tip before each use. A rounded, worn tip needs far more pressure to mark, and pressure is exactly what damages both the work and the tool.
Store an electric engraving pen with its tip retracted or capped so it cannot be chipped in a toolbox. Loose tips belong in a small labelled container rather than rolling around a drawer.
If the tool is cordless, charge it before storage rather than leaving it flat for months, and keep it out of a hot car where battery cells degrade quickly.
Common problems and quick fixes
- The line is faint or invisible. The material is harder than the tip is fresh. Raise the speed, slow your travel and add a second pass rather than pressing harder.
- The tip skips across the surface. Too much pressure or too steep an angle. Lower the angle, lighten the hand, and let the vibration cut.
- Glass chips instead of frosting. Speed is too high. Drop to the lowest setting, use a fine tip and keep the pen almost flat.
- The tool feels weak. On a cordless model this is usually a low battery; on a corded one, dust packed around the tip collar. Clean it and recharge before assuming a fault.
Who should skip it
Anyone who needs identical marks on many items will be happier with a stamping set or a laser service. Hand engraving is charming precisely because it is not uniform.
People marking a genuinely valuable antique or a piece of jewellery should stop and ask a professional. A permanent mark on the wrong object destroys value rather than protecting it.
If you only need to label plastic storage boxes, an electric engraving pen is more tool than the job requires. A label maker is faster and easier to change later.
Lettering that looks deliberate
Most projects come down to writing a name or a date, and hand lettering is where amateur work usually gives itself away.
Print rather than join the letters. Separate strokes are far easier to control with an electric engraving pen than a continuous cursive line, and mistakes stay contained to one stroke.
Draw guide lines first, top and bottom, in fine marker. Letters that drift upward across a name are the most common flaw, and two pencil-thin guides prevent it entirely.
Space the letters slightly wider than feels natural. Engraved lines are thin, and text that looked well spaced on paper reads as cramped once it is cut into metal.
Work the straight strokes first and the curves last. By the time you reach the curves your hand has settled into the rhythm of the tool, and curves are where an electric engraving pen is hardest to steer.
Curved and awkward surfaces
Flat practice pieces are kind. Real objects are round, tapered or already assembled, and that changes the approach.
On a curved surface only a small part of the tip is ever in contact, so travel slowly and rotate the object rather than swinging your wrist around it. A bottle or a tool handle should turn underneath a steady hand.
Pad the workpiece so it cannot roll. A folded towel in a shallow tray holds a round item still far better than fingers can, and it protects the finish on the side you are not marking.
For a recessed area, check that the body of an electric engraving pen physically clears the surrounding surface before starting. Discovering halfway through a letter that the barrel is fouling is a frustrating way to ruin a piece.
Building a small engraving kit
The tool alone does most of the work, but four cheap additions make every session easier.
A fine permanent marker and a small bottle of alcohol let you draw, adjust and wipe away guide lines as often as you like before anything becomes permanent.
A rubber mat stops workpieces sliding, and a small clamp handles anything the mat cannot. Between them they solve most of what goes wrong on a first project.
Safety glasses and a soft brush complete it. The brush clears debris from the line as you go, which lets you see the real depth instead of guessing at it under a layer of dust.
Keep the whole set in one box with the electric engraving pen. Tools that live together get used; tools scattered across three drawers do not.
Buying checklist
- Does the electric engraving pen have variable speed? Without it, glass and hardened steel cannot both be handled well.
- Are the tips replaceable and available? Tips are consumables, and a sealed tip fixes the tool’s lifespan.
- Is the grip comfortable for long sessions? You will hold it like a pen for far longer than you plan to.
- Cordless or corded for your work? Marking fixed objects favours cordless; long bench sessions favour corded.
- Is the vibration tolerable? Excessive vibration produces a shaky line and tired hands.
Other picks at WLD Store
These related listings sit nearby in the WLD Store range.

Frequently asked questions about an electric engraving pen
Can an electric engraving pen mark stainless steel?
Yes, though it is one of the harder materials. Use a higher speed setting, move slowly and expect two or three passes. Tips wear faster on hardened steel than on aluminium or brass.
Will it work on glass without cracking it?
It will, at low speed with a light touch and a fine tip. The result is a frosted etched line rather than a deep groove. Practise on a jar before touching anything you care about.
Do I need to press hard?
No, and pressing hard is the most common beginner mistake. The vibration does the cutting, so an electric engraving pen needs guiding rather than pushing. Extra depth comes from more passes.
Can mistakes be removed?
Not really. On soft metal a shallow error can sometimes be polished out with fine abrasive, but the mark is designed to be permanent. Sketch the design in marker first and check it before switching on.
Is it safe for children to use?
It is a powered tool with a hard vibrating tip, so it belongs in adult hands. An older child can be involved under close supervision with eye protection, but it is not a toy.
How long do the tips last?
That depends entirely on the materials. Soft metals and wood barely wear a tip; hardened steel and ceramic wear one quickly. Keeping spares means an electric engraving pen never sits idle waiting for a part.
With a light hand and a little practice on scrap, an electric engraving pen makes permanent marking a two-minute job rather than an errand. You can view the current listing on the Electric Engraving Pen page or browse more tools and stationery in the Office Supplies section, with secure checkout and availability across Saudi Arabia.



Add comment